2019 – a look back

PGXF1505
Some of my favourite makes of 2019

I always enjoy reading other people’s yearly round ups and seeing as I managed to blog semi-consistently this year I thought I would do one of my own. 2019 was a year of adjustment in our family’s life, mostly good changes however life somehow gets very busy and I didn’t get to sew as much as I would have liked. Regardless, I still managed to make quite a few things and looking back I’m really pleased with what I achieved sewing wise.

ACS_0676
My first maya top and V9075 heavily modified into a pair of wide legged pants

2019 was the year of linen and maya tops for me. I’d never sewn with linen before as I’d never found a pattern that suited both my style and this fabric. However, once I found the maya top a love affair began. I originally made the same modifications that Lisa outlined on the Tessuti blog which have proved very popular amongst the sewing community. Since then I’ve refined them more (see the bottom of this post) so that the neckline is just narrow enough so that my bra straps aren’t peeking out. I’ve even gone back and changed the two tops that I made with the wider neckline and since then I haven’t gone more than a few days without sporting a maya top!

Once my love affair with linen started I began scoping out linen sources in Australia as I couldn’t get enough of it. Living in a few hours out of Melbourne having so many great online options is a godsend and I embraced online and phone fabric shopping. I would highly recommend doing phone orders from the Fabric store in Melbourne for anyone living in Victoria who can’t get to the store. The girls have always been super helpful and accommodating and shipping is both fast and reasonably priced.

ACS_0554
Another maya top and kwik sew 4221 hacked into clyde pants (more details here)

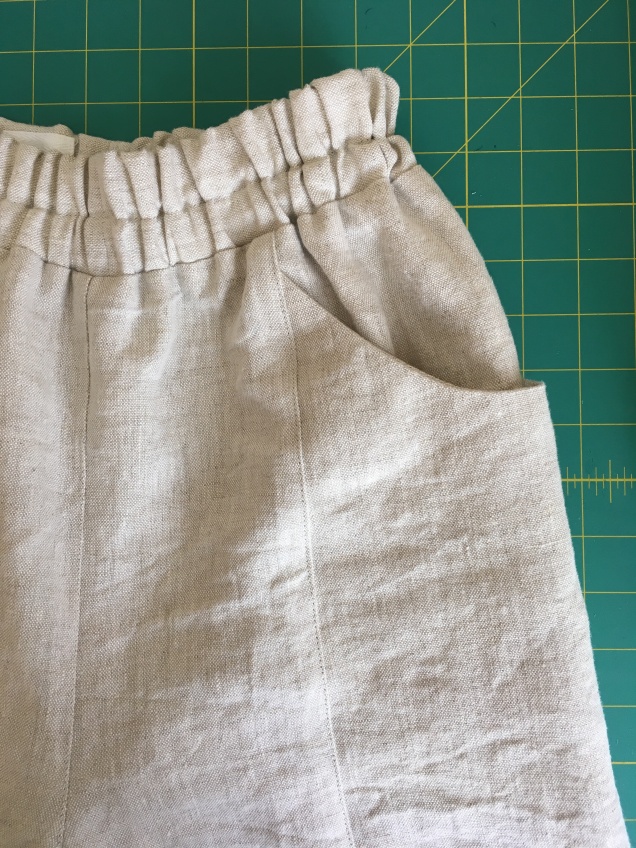
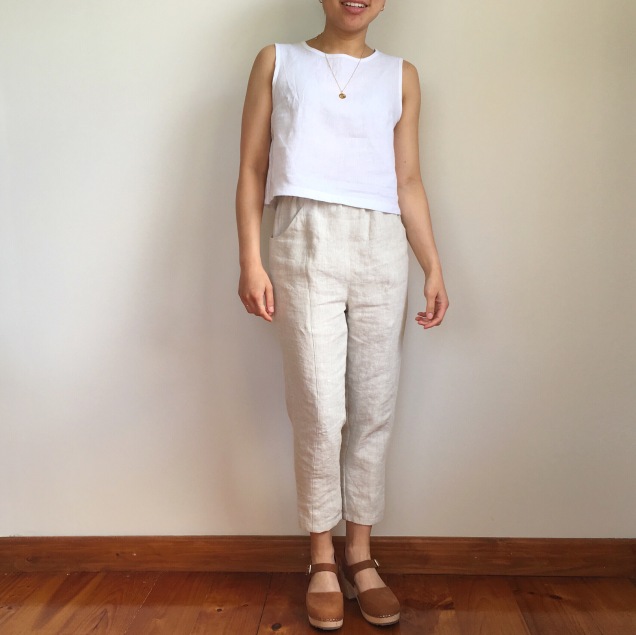
I’ve bought linens from both the Fabric store and Potter and co and have been really pleased with the fabric from both of these sources. I’ve used linen to make my first ever jumpsuit, wide leg pants and countless maya tops. I’ve got a few more lovely cuts in my stash and there many more things I’m planning to make out of this beautiful substrate.

I did a lot more pattern hacking and tweaking this year, and really took my time with each project. I’m definitely a bit of a perfectionist (my husband lovingly refers to me as being very “particular”) and I embraced this trait in order to end up with things that I would really love. I utilised hand basting rather than just pinning for basting seams together before a try on and found that not only were the stitches super easy to rip out, but it was a lot less painful than using pins!

ACS_0638
Ginger jeans and an archer shirt (more details here)

One example of embracing my fussiness was my Elliot sweater. I made this out of a perfectly proportioned striped French terry from Guthrie and Ghani. I’d had it sent to my brother (who lives in the UK) and he brought it over to Australia when he was home for a visit. I agonised over which view to make and ended up mashing together bits of all three views. I attempted stripe matching (for the first time ever!) and was rather disappointed with the three quarter length sleeves.

ACS_0185
My well loved Elliot sweater (more details here)

I knew that in order to make this sweater more wearable full length sleeves would be needed. I didn’t have enough fabric to cut out another pair of sleeves so instead cut out a rectangle to sew onto the ends of the existing sleeves to extend the length. I painstakingly considered how to cut and attach the new sleeves so that the stripes would not be affected and the join barely visible. Once I’d done that I didn’t like the shape of the lower part of the sleeve so unpicked the seam and narrowed the sleeve towards the hem.

Now a couple of years ago I never would have gone to that much effort to fix these little things that were bothering me about a project but I’m so glad that I did. This has become one of my most worn garments in my wardrobe and during the cooler months it’s worn several times a week. I love the length and side slits (which were altered slightly from the original pattern) and I’m looking forward to the weather cooling down so this top can return to my regular rotation.

ACS_0565
Peppermint jumpsuit and Lark tee (more details here)

Making the Elliot sweater made me realise how awesome turtlenecks (or skivvys as we refer to them in Australia) are. I hadn’t worn one since primary school but having my neck covered up noticeably decreased the eczema I normally suffer with on my neck so I promptly made up a few more. I used the Grainline studio Lark tee, making the crew neck version and increasing the width of the neckband to create the turtleneck. These have been great not only for wearing on their own, but also for layering under my peppermint jumpsuit.

ACS_0290
Berlin jacket (more details here)

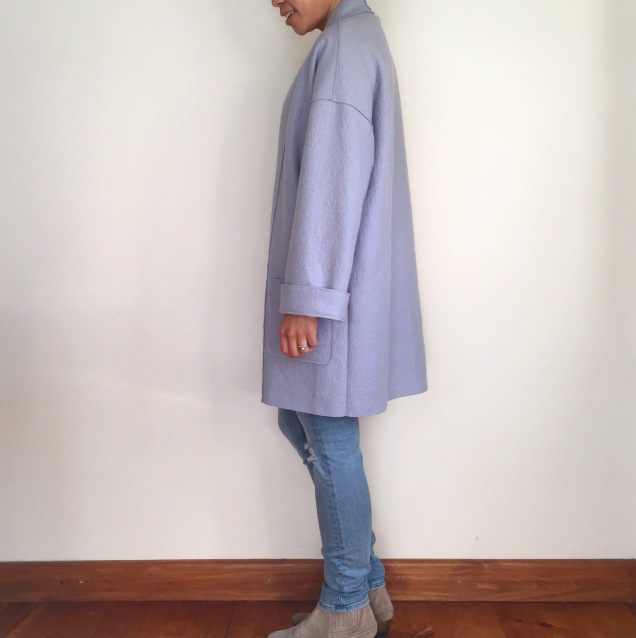
I made my second garment out of boiled wool, the super fast Berlin jacket using fabric from Tessuti. I’d had this pattern on my radar for a year or so before finally making my own version. The thing that was holding me back was not being able to find boiled wool that was both 100% wool and in a colour that I loved. I remember perusing the Tessuti website (as one does) and as soon as I saw this colour I immediately thought of the Berlin. I quickly pulled the trigger buying both the fabric and pattern and not long after had sewed it up. I’m glad I waited until I found this fabric as I absolutely love my jacket and have worn it so much.

ACS_0516
Love the back neckline of this Belen bodysuit (worn with the same wide legs pants at the beginning of the post before I reduced the width of the legs more details here)

I did my first ever pattern test for the lovely Jasemin of sewing.masin making the Belen bodysuit. I enjoyed making a style that was a bit out of my comfort zone and it’s been great for a nice streamlined tucked in look.

ACS_0360
Ogden + Maya

One of my favourite makes of the year was an Ogden cami that I hacked into a dress to be worn with a silk organza maya top over the top. The inspiration for this outfit came from a dress I saw in a magazine many years ago. I’d been quite taken with this outfit and had even bought similar looking fabric at least five years ago. Luckily I’d kept both the fabric and picture and was rather happy with how the end result turned out.

I finally met some sewists in real life, both locally and at my first ever frocktails. I was absolutely thrilled to find some fellow sewists who live very close by and even more thrilled to be able to natter away with other lovely ladies who share my passion/obsession with this hobby. I connected with so many lovely sewists on Instagram who constantly inspire and amaze me, both with their creations and their encouragement and kind words. Thank you for reading and following along and here’s to another great year of sewing ahead!

Pattern hacking Kwik sew 4221

ACS_0552

So over the last six months or so I’ve completely fallen head over heels with the whole Elizabeth Suzann brand and aesthetic. It all started with the hacked Maya top on the tessuti blog and once I discovered the Georgia top that inspired it I fell down a bit of a rabbit hole. As I’ve mentioned before I’ve got two very young children so have been stuck in a bit of style rut lately. I’ve been wearing the same tried and true silhouettes (and been comfortable doing so) but it’s been really refreshing to shake things up and try something different.

ACS_0551

In the past few months I’ve made my first pair of culottes, as well as my first pair of wide leg cropped pants and have really been enjoying them. The next new shape I wanted to try was something resembling the Elizabeth Suzann Clyde pants. Luckily I stumbled across this very helpful tutorial written by Catherine who you should go check out on Instagram if you don’t already follow her (love her style!) While I probably could have worked it out on my own it was so helpful being able to follow along with her instructions and I’m so appreciative that she put the time into writing that post.

ACS_0555

Catherine used the Marigold trousers as her starting point but mentioned that any tapered elastic waisted pants pattern would work. I trawled through the fold line database and came up with Kwik sew 4221. As always, I ignored the cover photo and zoned straight in on the line drawing. It seemed promising so I purchased the pattern and got started.

IMG_1028

I traced out the smallest size but did end up tapering in the legs slightly. My pants ended up measuring about 6.5” at the leg opening. I muslined the pattern before trying to alter the style lines just to check the fit of the crotch area and luckily I didn’t have to do any adjustments. The original pattern has a front and back pattern piece with side seams (like most pants). I basically followed Catherine’s very clear instructions to change the side seam into a front and back leg seam and create the pockets. My pockets started 1 ½ ” down from the waist seam with the bottom of the curve about 2 ½” further down. I made them about 10” deep as that seemed about right for where my fingertips hit.

IMG_1026
Those pockets! And the topstitching that got unpicked multiple times!

The only thing I did differently was not create one big pattern piece for each leg before altering it into three pieces. Instead I drew the new seam lines on the front and back leg, created the new front and back pieces and then pivoted the two remaining parts of the old pieces along the old side seam (if that makes any sense). I did this as the old side seams were fairly curved so they did not fit together side by side properly without a significant amount of overlap. Although in hindsight I would not recommend doing this as I think this is what contributed to some “pouching out” on my front seamlines near my hips (not exactly flattering!)

ACS_0556

I drafted a straight waistband which was basically a rectangle 5” wide and the length of the finished circumference of the top of the pants. I used two loops of ¾” wide elastic and each channel was 1” wide. The elastic I used did narrow a fair bit when stretched so I decided to topstitch it down vertically at each seamline. Unfortunately I managed to twist the top band of elastic while topstitching it (grrrrrr) and had to unpick some of my stitching in the ditch which proved to be almost impossible as for once I’d actually done my stitching right in the ditch!

In the end I had to unpick the waistband and overlocking to unpick the topstitching but as always it was worth it. I also stitched a small piece of twill tape to the waistband to mark the back of the pants. One of these days I’d like to get some labels to stitch into my handmades but haven’t gotten around to that yet. I pinned up the hems at a couple of different lengths and decided on a slightly cropped length.

ACS_0553

While I had been googling “Elizabeth Suzann Clyde pants” to see how people were styling their pants I’d come across this post and had fallen completely in love with the whole outfit. If you don’t want to click through basically this blogger is wearing an oatmeal pair of clyde pants with a white linen Georgia tee. When I found this cotton/linen blend in the perfect oatmeal colour from the Fabric store that I made my pants out of I also bought some midweight white linen as I just couldn’t get that outfit out of my head.

ACS_0547

So of course I also made a cropped Maya top out of that white linen and have basically recreated my dream outfit (woohoo!) When I was buying this linen it was the end of the roll and there was only 1.2m left. Now while I usually dwell on the negative side of being so short (150cm) one of the major positives is that I always need less fabric than the pattern calls for. I was able to squeeze both a Maya top and another hacked New Look 6483 out of my 1.2m so was pretty happy with that.

ACS_0548

And that was meant to be the end of the story…but once I’d taken some photos I really wasn’t happy with how these pants had turned out (doh!) I took a bit of a break from these pants and over the course of the next few weeks (while working on another project) I did a lot of unpicking, hand basting, checking the fit then finally re-sewing some of the seams. I’ve done a side by side comparison below with the before and after. The changes were pretty small but I think they made a big difference to the overall silhouette, particularly to the lower leg.

LOEQ4284
L-R: After and before. The almost identical posing was completely accidental haha!

I ended up taking in the seam allowances along both the front and back seams (which had already been topstitched down grr) then had to unpick some of the front seam again as I’d been a bit too aggressive and they were a bit too tight. I’m pretty happy with the end result and particularly love the colour combination of these outfits. I wore these pants and my Maya top for the first time recently and loved how breezy and stylish I felt – I’m sure I’ll be wearing this combo on repeat particularly as the warm weather has finally arrived. Happy sewing xx

ACS_0554
Pose inspired by the inimitable Julia Bobbin!

Ode to the Maya top + #sewjapaneseinjuly

ASRW3504

I’m not really one to participate in community challenges as a lot of the time they’re seasonally inappropriate or the themes don’t really align with what I’m sewing at that time. With two small kids sewing time is a precious commodity so I’m very selective about what I use it for. Don’t get me wrong, I think challenges are a great way to get motivated and to connect with others in our lovely community so I certainly enjoy following along and seeing what amazing things others make.

ACS_0479

When #sewjapaneseinjuly popped up with the following description (quoted from @bloglessanna’s Instagram post): “@craftyjane_makes and I are hosting #sewjapaneseinjuly next month. This is a sister event to #sewjapaneseinjanuary that allows for seasonal variations between hemispheres! Will you join us and sew from your Japanese pattern books and/or Japanese fabric stash in July and use the hashtag? No sponsors, giveaways or commercial partnerships… this is a community event, open to all, aimed to motivate and inspire.” I immediately thought of a gorgeous Nani Iro double gauze that had been kicking around in my stash since last year.

According to my Instagram feed I’d purchased this back in October last year at the dreamy Fibresmith. I’d gone there to purchase some see you at six French terry which has been turned into a very well worn pair of Anima pants. While I was taking my sweet time browsing I noticed a lady at the counter purchasing some beautiful fabric. It seemed vaguely familiar but I couldn’t put my finger on why. There didn’t appear to be much fabric left on the bolt so as she was getting it cut I was silently hoping there would be enough left for me to get some too!

ACS_0482

As soon as she was done I quickly popped up to the counter to ask about the fabric. It turns out that it was an old Nani Iro double gauze which Leslie (the lovely owner of Fibresmith) had bought on her recent buying trip to Japan. Now I’m really not one for impulse shopping but this print was just too gorgeous to pass up on. When I found out there was about 1.5m left on the bolt I happily snapped it up. This fabric has been happily hanging out in my stash ever since as I wanted to find the “perfect” pattern to use it for.

ACS_0005
Maya top #1

#sewjapaneseinjuly was a great reminder to use this fabric and once I started thinking about it I realised that I already had an ideal pattern to use it for – the Marilla Walker Maya top. I’ve briefly mentioned my first Maya top here but since then I’ve made three others so thought it was about time I give this pattern a proper blog post. I’d never really taken much notice of this pattern until Lisa from Tessuti fabrics did a post about it in December last year. It seems that lots of sewists have made it up with a few modifications to resemble the cult Georgia tee.

ACS_0015
Worn with Anima pants

Once I saw Lisa’s version I was completely in love and saw this pattern in a new light. All the possibilities flashed through my head (cropping it even more, adding a gathered skirt etc) and I got myself a copy. I followed the modifications outlined by Lisa (adding an extra inch at the centre front and back seams, lengthened the sleeve length of the size one to the size five, added rectangular sleeve cuffs and finished the neckline with double fold bias instead of a facing) and was so thrilled with the end result.

ACS_0247
Maya top #2

My second version was made out of another linen, this time from Tessuti fabrics and the only difference between the two versions was to make this one slightly shorter. I’ve gradually been wearing more high-waisted bottoms and a cropped top pairs better with these.

ACS_0318
Maya top #3

For my third version I veered away from linen (which has quickly become my favourite fabric to sew with) and upped the ante by using silk organza. This was made as part of a wedding outfit to be worn over an Ogden cami lengthened into a dress. I cropped this one even more but construction wise everything else was pretty much the same. For more details click here.

ACS_0355
The full outfit – possibly one of my favourite makes ever!

This finally leads me to version number four, made out of Nani Iro. I’ve never worked with double gauze or Nani Iro before but have certainly thought this line of fabrics was stunning. Luckily it was pretty straightforward to work with, and would have been a really simple sew if I hadn’t messed up the seam allowance. The top is French seamed and for some reason I sewed the shoulder and side seams incorrectly making the armholes narrower by a total of 1”. Originally I’d thought “oh that won’t make a difference” and kept on going.

ACS_0408
Maya top #4

Boy was I wrong! I tried on one of my other Maya tops and pinned the armholes smaller by 1” and it was apparent that they were too tight! I sulked for a night then the next day resolved to get the seam ripper out. I knew I wouldn’t wear the top much otherwise and while I’m very glad I did fix it unpicking French seams in double gauze is no joke (eye roll). The fact that I’d found thread that was a perfect colour match did not help either. As I couldn’t face unpicking the whole length of the side seams and shoulder seams I just unpicked from the armholes for about three inches. I then had to resew those seams with the narrowest possible seam allowances.

ACS_0486
Worn with my V9075 culottes

Luckily I managed to ekk out enough extra room in the armholes and from there on in it was smooth sailing. I tried on my original Maya top pinned at several different lengths with different jeans/pants/skirt combos to settle on its length. In the end I cropped it by two inches as that way it wasn’t too short to wear with mid-rise jeans but also worked for a half tucked look too. The pattern has a bit of a flare at the hem which has to be eased in however this time I straightened out the side seams. I subsequently also had to straighten out the gentle curve of the bottom edge and this made hemming the top a breeze.

ACS_0490
Plus some bonus “sleeves” for warmth

I had enough fabric left over to make a cropped shell top using new look 6483. It may not look like much from the pattern envelope but I found it to be a versatile little top and after making a few alterations I was pretty pleased with how it turned out. I made view E except I raised the neckline 3/4″ all the way around tapering to 1/2″ at the centre back seam. I raised the bust darts by 1 1/4″, straightened out the side seams (it was originally more fitted at the waist) and removed 1″ from the width of the centre back seam on either side tapering to nothing about halfway down as it was gaping on me. I used double fold bias binding instead of a facing to finish off the armholes and neckline and cropped the length by about 5″.

ACS_0409

Now writing all of those changes out makes it seem like it was a lot of work but it really didn’t take that long to do. As I’ve gained more sewing experience it’s become a lot easier to tell just by looking at the flat pattern piece what changes may need doing. And fine tuning a pattern has also become less tedious as I can really see the value it getting things just right so that I’m satisfied with the finished garment.

ACS_0453
Worn with a pair of hacked V9075 pants

I’m very happy to have finally used this gorgeous fabric and am excited for the weather to warm up so I can wear these tops! I may have yet another Maya top planned as this is such a winner of a pattern. Easy to sew, super comfortable yet more elevated than a basic tee. I feel put together and polished when wearing it and this is a true TNT pattern for me. I’d love to hear about your TNTs. Happy sewing xx

Edited 25/9/19 I’ve tweaked my Maya top slightly as I found the neckline was a bit too wide for me. Here is the complete list of changes I use for my current pattern: added an extra inch at the centre front and back seams, shaved off about 1/2″ from the shoulder seams at the neckline tapering to nothing at the armholes, lengthened the sleeve length of the size one to the size five, straightened out the side seams removing the slight waist shaping, straightened out the slightly curved hem, added rectangular sleeve cuffs and finished the neckline with double fold bias instead of a facing